
America's STORYTELLER
Telling Untold Stories in Photographs, Prose and Public Speaking
http://tellmeastory-marcia.blogspot.com/
Here's my version of
Sandra Malone's Pencil Angels.
Sandra Malone's Pencil Angels.
 |
| Copyright 2014 Marcia Norwood |
Here's how I made my Pencil Angels.


I purchased the book, Hang Ups, at Hobby Lobby.
You can order the book from Sandra's online website.
www.sandrastudio.com
 |
| Copyright 2014 Marcia Norwood |
I always make a copy of the pattern, and cut it out.
The page below lists the acrylic
paint colors Sandra used.
 |
| Copyright 2014 Marcia Norwood |
The 3/4-inch dowels
(available at craft stores and Home Depot and Lowes)
are cut approximately 8-inches long,
and tapered at the tip to resemble a pencil.
 |
| Copyright 2014 Marcia Norwood |
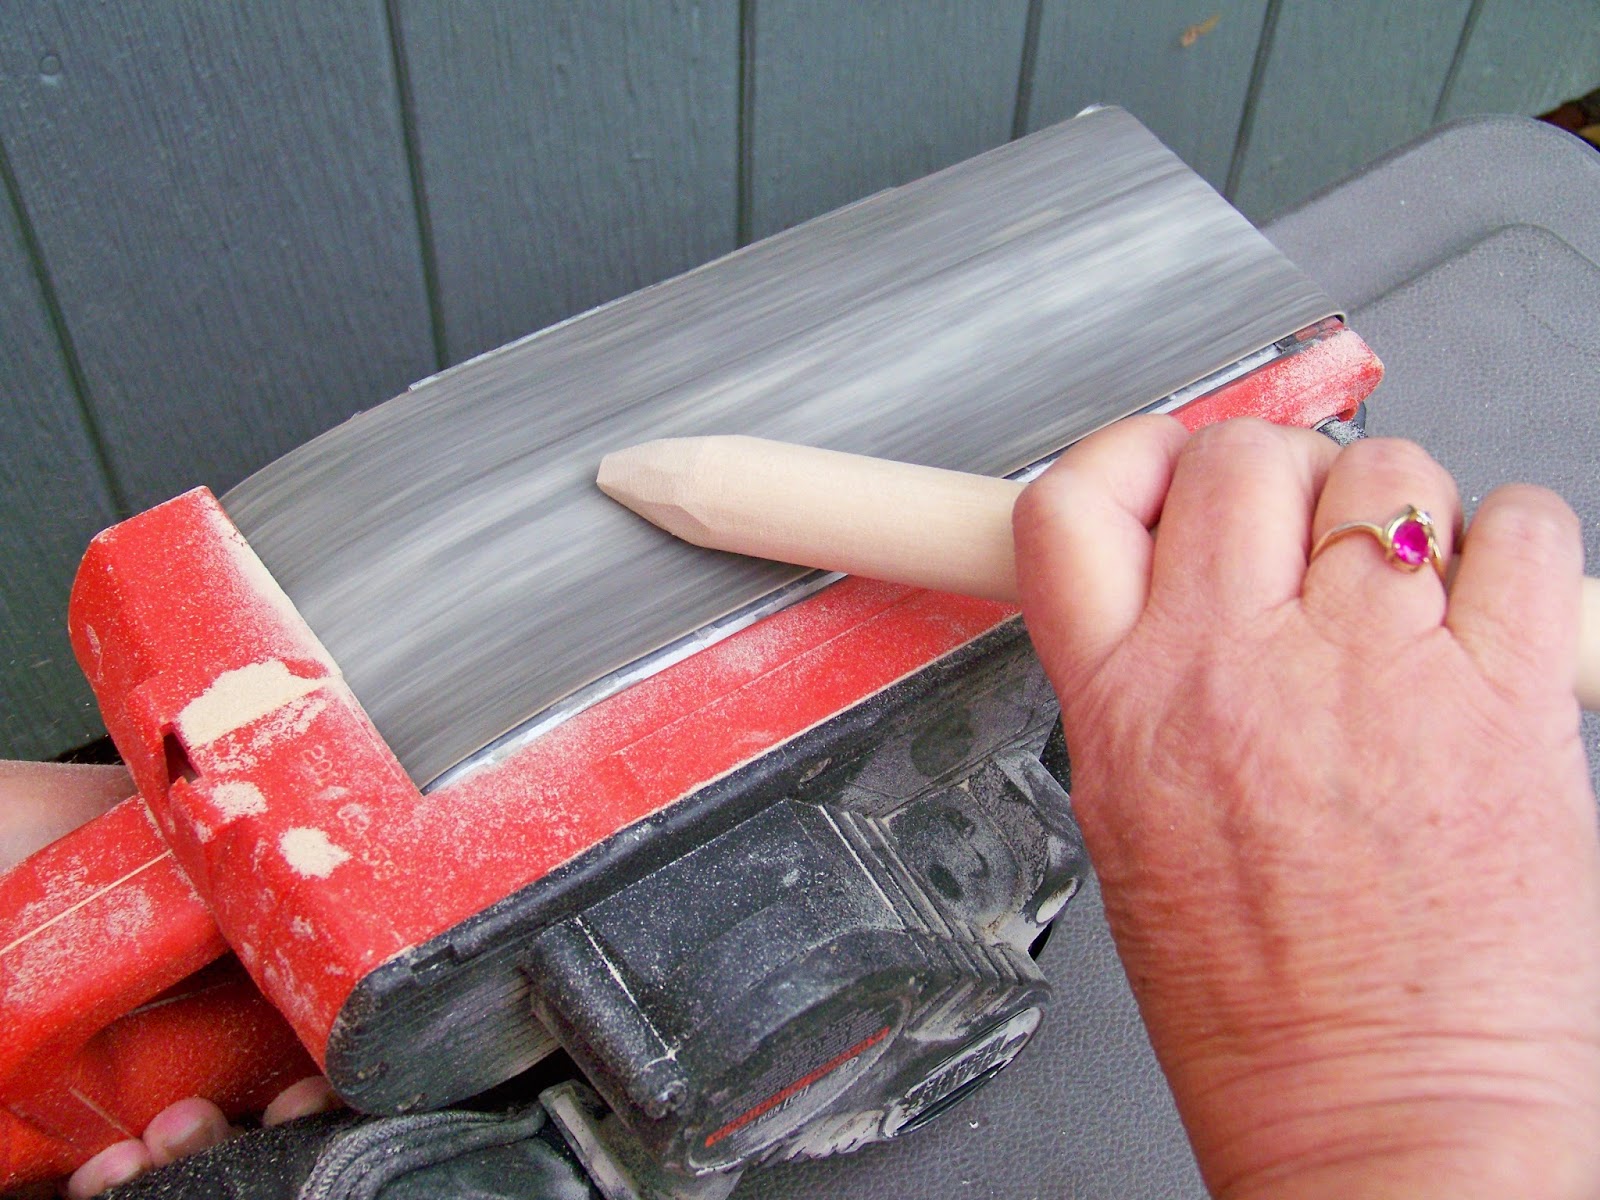
One of the carpenters at my house
took my stationary belt sander.
So - I turned a hand-held sander upside down,
and used it to carve/taper the ends of the dowel
to look like a pencil.
 |
| Copyright 2014 Marcia Norwood |
This process is messy, so I went outside to do it.
Wear a mask so you don't inhale sawdust.
Wear eye protection.
I love the smell of sawdust.
It reminds me of working with my Dad in his workshop.
 |
| Copyright 2014 Marcia Norwood |
Tools & Supplies
Screw Eyes
(Available at Hardware Stores)
Hammer
Pliers
Nail/Brad
Sandpaper (Fine & Medium)
Brown Bag
(Grocery or Lunch Bags are great to use
as FINE sandpaper.)
 |
| Copyright 2014 Marcia Norwood |
Screw eyes go in the top of the angel,
so a hanger can be added later.
 |
| Copyright 2014 Marcia Norwood |
I use a small nail or brad to make a
small hole in the top of the dowel,
so the screw eye goes in easier.
 |
| Copyright 2014 Marcia Norwood |
the screw eye.
Having the screw eye in now
gives you something to hold on to
when painting later,
and you can add a hanger
to let the dowel rod dry when painted.
 |
| Copyright 2014 Marcia Norwood |
 |
| Copyright 2014 Marcia Norwood |
Sand the dowel rod to remove price labels.
Sand until dowel is very smooth.
Use a soft wet rag to wipe down the dowel after sanding.
 |
| Copyright 2014 Marcia Norwood |
Gather paints, brushes, palette and container for water.
If you don't have a paint palette, use a paper plate.
 |
| Copyright 2014 Marcia Norwood |
 |
| Copyright 2014 Marcia Norwood |
Acrylic paints are available at craft and hobby stores.
They cost from 99 cents to $1.99.
I didn't use the exact paint colors or brand of paints
listed in Sandra's book.
You don't need ceramic paints for painting on wood.
Acrylics dry fast, and clean up with soap and water.
 |
| Copyright 2014 Marcia Norwood |
Purchase the most expensive brushes you can afford.
 |
| Copyright 2014 Marcia Norwood |
WORK ON YOUR PALETTE
Put a few dots of paint on your palette (paper plate)
and add a tiny bit of water
until the paint is a nice consistency...
not too thick and not too thin.
I used a small sponge brush to blend two paint colors
to achieve the base color of the dowel.
 |
| Copyright 2014 Marcia Norwood |
 |
| Copyright 2014 Marcia Norwood |
I added hangers to the screw eyes,
and hung the dowels (painted with the base coat)
from my pot rack to dry.
If you don't have a pot rack to hang your angels from,
use a coat hanger.
If you don't have a pot rack to hang your angels from,
use a coat hanger.
 |
| Copyright 2014 Marcia Norwood |
 |
| Copyright 2014 Marcia Norwood |
When paint is dry,
sand the angels with a piece of brown paper bag/sack
or fine sandpaper to remove rough places.
Painting raises the grain in the wood.
 |
| Copyright 2014 Marcia Norwood |
 |
| Copyright 2014 Marcia Norwood |
Paint the top (eraser area) of the pencil angel.
Remember to work on your palette first,
and add a tiny bit of water to the dots of paint.
Be sure it is a nice consistency before painting the dowel.
 |
| Copyright 2014 Marcia Norwood |
Paint the tip of the pencil black.
Paint thinned brown or burnt umber
over the tapered area of the pencil,
just enough to divide this area from the rest of the pencil.
 |
| Copyright 2014 Marcia Norwood |
 |
| Copyright 2014 Marcia Norwood |
FACE AND CHEEKS
Dry brush the face area and cheeks.
Add a tiny oval for her mouth.
Streak white down the front of her face to resemble a nose.
I used an ultra fine point Sharpie
permanent marker for the eye-lashes.
 |
| Copyright 2014 Marcia Norwood |
 |
| Copyright 2014 Marcia Norwood |
 |
| Copyright 2014 Marcia Norwood |
 |
| Copyright 2014 Marcia Norwood |
 |
| Copyright 2014 Marcia Norwood |
 |
| Copyright 2014 Marcia Norwood |
Spatter or fleck the angels (and later on the wings)
with black paint, using an old tooth brush.
 |
| Copyright 2014 Marcia Norwood |
Dab the brush on a paper towel first,
almost using a dry bush.
This gives an aged effect of old wood.
 |
| Copyright 2014 Marcia Norwood |
 |
| Copyright 2014 Marcia Norwood |
Try spattering either on a flat surface,
or when dowels are hanging up.
Be careful - you will spatter things behind the dowels.
 |
| Copyright 2014 Marcia Norwood |
 |
| Copyright 2014 Marcia Norwood |
Sandra painted on hair to make curls.
I used a hot glue gun to
add Spanish Moss for curly hair.
 |
| Copyright 2014 Marcia Norwood |
 |
| Copyright 2014 Marcia Norwood |
Have FUN making and shopping for angel accessories!!!
 |
| Copyright 2014 Marcia Norwood |
Aren't they beautiful?
 |
| Copyright 2014 Marcia Norwood |
 |
| Copyright 2014 Marcia Norwood |
WINGS
Glue scrapbook papers to card stock.
Sandra used Liquitex Matte Gel
or Americana Decoupage Medium.
I used Mod Podge and glued three papers together:
one cardstock between two scrapbook papers...
so that the patterned papers were facing outward,
and the scrapbook paper was on the inside.
 |
| Copyright 2014 Marcia Norwood |
I tried making wings two ways.
First I cut out wings from scrapbook paper and cardstock,
and then glued them together.
They didn't always fit together perfectly.
 |
| Copyright 2014 Marcia Norwood |
 |
| Copyright 2014 Marcia Norwood |
 |
| Copyright 2014 Marcia Norwood |
Apply Mod Podge with a disposable foam brush.
 |
| Copyright 2014 Marcia Norwood |
 |
| Copyright 2014 Marcia Norwood |
The second way worked better.
1). Glue all three papers together.
2). Let them dry.
3). Trace around the pattern.
4). Cut out the wings.
 |
| Copyright 2014 Marcia Norwood |
I also used the three-layer paper
to cut out hearts as angel accessories.
 |
| Copyright 2014 Marcia Norwood |
Paint edges of wings on both sides
with brown or black paint.
 |
| Copyright 2014 Marcia Norwood |
 |
| Copyright 2014 Marcia Norwood |
 |
| Copyright 2014 Marcia Norwood |
Spatter or fleck the wings with black paint,
using an old tooth brush.
|
| Copyright 2014 Marcia Norwood |
 |
| Copyright 2014 Marcia Norwood |
 |
| Copyright 2014 Marcia Norwood |
Spray Clear Matte Acrylic Coating
on both sides of the wings and accessories,
in a well ventilated area, or outside.
Let dry.
 |
| Copyright 2014 Marcia Norwood |
 |
| Copyright 2014 Marcia Norwood |
Before adding the accessories...
spray the angel and wings
with Clear Acrylic Coating
to protect the paint and paper surfaces.
 |
| Copyright 2014 Marcia Norwood |
Poke a hole with a large needle,
to insert the wire for the wings.
You will be able to hang
angel accessories from the wire.
 |
| Copyright 2014 Marcia Norwood |
Roll the wire around a pencil or brush...for the ends.
 |
| Copyright 2014 Marcia Norwood |
 |
| Copyright 2014 Marcia Norwood |
Hot-glue the wings to the back of the angel.
I also wired the wings in place.
Sometimes the hot glue comes undone.
 |
| Copyright 2014 Marcia Norwood |
Angel Accessories
Mini-lights, burlap roses, paper hearts, feathers, keys...
Use your imagination!
 |
| Copyright 2014 Marcia Norwood |
Sign or initial and date the angel ornament.
I did this on the back.
You will be glad you did this in years to come.
 |
| Copyright 2014 Marcia Norwood |
 |
| Copyright 2014 Marcia Norwood |
 |
| Copyright 2014 Marcia Norwood |
 |
| Copyright 2014 Marcia Norwood |
I've been working on these pencil angels
on and off for one month.
They are a JOY to make,
and I'm excited to give them to friends and family
as Christmas gifts.
I found some beautiful boxes to wrap them in.
What a wonderful way to remember
the angels who announced the birth of our savior!
"Glory to GOD in the highest...
and on earth - peace, good will toward men."
 |
| Copyright 2014 Marcia Norwood |
 |
| Copyright 2014 Marcia Norwood |
 |
| Copyright 2014 Marcia Norwood |
|
| Copyright 2014 Marcia Norwood |
 |
| Copyright 2014 Marcia Norwood |
|
| Copyright 2014 Marcia Norwood |
 |
| Copyright 2014 Marcia Norwood |
 |
| Copyright 2014 Marcia Norwood |
 |
| Copyright 2014 Marcia Norwood |
 |
| Copyright 2014 Marcia Norwood |
 |
| Copyright 2014 Marcia Norwood |
"Fear not! Behold I bring you good tidings of great joy.
Unto you is born this day, in the City of David,
a Savior, who is Christ the Lord."
 |
| Copyright 2014 Marcia Norwood |
"You shall find the babe,
wrapped in swaddling clothes,
lying in a manger."
 |
| Copyright 2014 Marcia Norwood |
|
| Copyright 2014 Marcia Norwood |
Merry Christmas!
Here's one last look at the angels
I made from dowel rods.
Look on my previous blogs to see how to make the angels.
Here's one last look at the angels
I made from dowel rods.
Look on my previous blogs to see how to make the angels.

CLICK on the link or COPY & PASTE the link in your browser:
https://search.yahoo.com/search?fr=mcafee&type=B111US0D20140720&p=hark+the+herald+angels+sing

I named each angel with a name
that begins with "C."

Each angel comes with a handmade card.

The original hymn was composed as a "Hymn for Christmas-Day"
by Charles Wesley,
included in the 1739 John Wesley collection Hymns and Sacred Poems.
In 1855, English musician William H. Cummings adapted Felix Mendelssohn's secular music
from Festgesang to fit the lyrics of "Hark! The Herald Angels Sing"
written by Charles Wesley.
CLICK on the link or COPY & PASTE the link in your browser:
http://en.wikipedia.org/wiki/Hark!_The_Herald_Angels_Sing#cite_note-5


Each angel is wrapped in tissue paper and ready for delivery!

The back of one angel, Charity, has a starfish!


Happy Birthday, Jesus!
Hark! The Herald Angels Sing!
Glory to the Newborn King!

Thanks for stopping by!
Come back often, and invite a friend!
 |
| Copyright 2014 Marcia Norwood |
Mary Marcia
America's STORYTELLER
Telling Untold Stories in Photographs, Prose and Public Speaking
 |
| Copyright 2014 Marcia Norwood |
No comments:
Post a Comment