Pages

Thursday, February 23, 2017

RECIPE FOR STRAWBERRY JELL-O POKE CAKE

Mary Marcia
America's STORYTELLER
Telling Untold Stories in Photographs, Prose and Public Speaking


Permalink
http://tellmeastory-marcia.blogspot.com/2017/02/recipe-for-strawberry-jell-o-poke-cake.html
  My mother made this 
STRAWBERRY JELL-O POKE CAKE  for our family.

It is absolutely delicious!


Ingredients
  • 1 Box White Cake Mix
  • Plus all ingredients the box calls for (See Below)
  • 1 (3 ounce) packet Strawberry JELL-O
  • 1 CUP Boiling Water
  • 1 CUP Cold Water 
  •  8 ounces Cool Whip thawed (or other whipped topping).
  • 1/4 Teaspoon Almond Extract
  • 1/4 CUP  Powdered  Sugar
  • Sliced Strawberries


GREASE 13 x 9 inch cake pan.


BAKE cake according to box directions in a 9 x 13 inch pan.

The Betty Crocker cake mix I used called for:
1 and 1/4 CUP Water
1/3 Cup Vegetable Oil 
(I used 1/3 Cup Butter)
3 Egg Whites


  POUR batter into cake pan.
 

BAKE cake according to box directions in a 9 x 13 inch pan.

When cake is done, COOL for about 15 minutes.


While cake is cooling, BOIL 1 CUP of water 
in a medium sauce pan over medium heat on stove top.

ADD JELL-O packet to boiling water,
and STIR until completely dissolved.

Then STIR in  1 CUP of cold water.


 Using a fork, POKE holes in the cake.


POUR JELL-O evenly over the top of the cake.


 COVER cake, 
and PLACE in refrigerator for three (3) hours.

COMBINE:

  • 8 ounces Cool Whip thawed (or other whipped topping).
  •  1/4 teaspoon almond extract and 
  • 1/4 CUP powdered sugar

in a medium bowl, 
and STIR to combine.


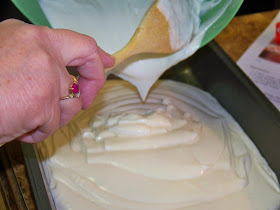
SPREAD evenly over the top of the cake.


ARRANGE sliced strawberries 
over the whipped topping as desired.


COVER cake and STORE  in refrigerator
for approximately one (1) hour until ready to serve.


 Yummy!


 Moist!


Strawberry goodness!


 More, please!


  ENJOY!

Thanks for stopping by!

Come back often, and invite a friend!

 Mary Marcia
America's STORYTELLER
Telling  Untold Stories in Photographs, Prose and Public Speaking


Tuesday, February 21, 2017

LAYERED VEGETABLE SALAD, DRESSING AND ROASTED PARMESAN CORN


Mary Marcia
America's STORYTELLER
Telling Untold Stories in Photographs, Prose and Public Speaking


RECIPES 
Layered Vegetable Salad, Peanuts, Balsamic Vinaigrette Dressing.  Copyright 2014 Marcia Norwood

LAYERED VEGETABLE SALAD
  BALSAMIC VINAIGRETTE DRESSING

ROASTED PARMESAN CORN 
 

Guess what I brought 
to our Independence Day celebration on July 4th?

You will have fun making, serving and eating this
layered vegetable salad and homemade dressing
anytime of the year.  
The Parmesan corn is delicious!

Link:  http://tellmeastory-marcia.blogspot.com/2017/02/layered-vegetable-salad-dressing-and.html
 
  Copyright 2014 Marcia Norwood
Layered Vegetable Salad
Makes 12 Servings


3 Cups English peas
3 Cups Chopped Red Bell Pepper
3 Cups Shredded Carrot
3 Cups chopped English Cucumber
3 Cups Seeded Chopped Tomato (I used cherry tomatoes.)
*White Balsamic Vinaigrette (Recipe Follows)

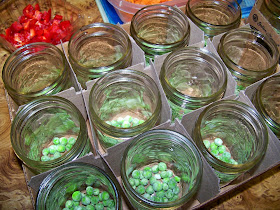
1.  In 12 (6-ounce jelly jars) layer 1/4 cup of each of peas, bell pepper, carrot, cucumber, and tomato. Put on lids, and refrigerate until ready to serve.

2.  When ready to eat, spoon desired amount of White Balsamic Vinaigrette into each jar.

*Note:  I couldn't find WHITE Balsamic Vinaigrette - so I use dark instead.  The taste is the same, only the color is different. 

  Copyright 2014 Marcia Norwood


I used frozen peas.  Copyright 2014 Marcia Norwood
 
I used cherry tomatoes, and added celery.  Copyright 2014 Marcia Norwood

Daughter Faith Diced the Cucumbers.  Copyright 2014 Marcia Norwood

First layer of  frozen peas.  SAVE the box and "dividers" that the jelly jars come in to store and transport the vegetable salads.  Copyright 2014 Marcia Norwood
   
Copyright 2014 Marcia Norwood
  
Copyright 2014 Marcia Norwood

Copyright 2014 Marcia Norwood

Balsamic Vinaigrette Dressing 


Copyright 2014 Marcia Norwood


Copyright 2014 Marcia Norwood

Balsamic Vinaigrette Dressing 
*2/3 Cup White Balsamic Vinegar
3 Tablespoons Sugar
2 Tablespoons Dijon Mustard
1/2 Teaspoon Garlic Salt
1/2 Teaspoon Ground Black Pepper
1 Cup Olive Oil


1.  In small bowl, combine vinegar, sugar, Dijon mustard, garlic salt, and pepper, whisking until sugar dissolves.  Gradually whisk in olive oil.  Cover and chill.  Store in an airtight container for up to two weeks.(SHAKE before using.)
 
*Note:  I couldn't find WHITE Balsamic Vinaigrette - so I use dark instead.  The taste is the same, only the color is different. I packaged the dressing in individual containers.  Remember to SHAKE before pouring on vegetable salad. 


Vegetable Salad, Dressing & Peanuts.  Copyright 2014 Marcia Norwood


Thanks to SOUTHERN Lady magazine 
                                           for these wonderful recipes!

Copyright 2014 Marcia Norwood

Roasted Parmesan Corn 


Copyright 2014 Marcia Norwood
Roasted Parmesan Corn 
Ingredients


1 Cup Grated Parmesan Cheese Cup White Balsamic Vinegar
1/2 Cup Melted Butter
1 Teaspoon Paprika
1/2 Teaspoon Ground Black Pepper
8 Ears Yellow Corn, Cut in Half  (I used Hy-Vee (frozen) Mini Corn on the Cob.)
Garnish:  Chopped Fresh Parsley


  Copyright 2014 Marcia Norwood


Directions
 
1.  Preheat oven to 450 degrees.  Line a rimmed baking sheet with heavy-duty aluminum foil.
2.  In a small bowl, combine Parmesan cheese, melted butter, paprika, and pepper, stirring to combine well.

3.  In a large resealable plastic bag, combine corn and Parmesan mixture.  Seal bag, and shake to coat corn.  Place corn in a single layer on prepared pan.  Cover tightly with heavy-duty aluminum foil.  Bake for 20 to 25 minutes.  Garnish with chopped fresh parsley, if desired.  


  SOUTHERN LADY Magazine. 


Recipe from SOUTHERN LADY Magazine.
  

Daughter Sarah.  Copyright 2014 Marcia Norwood

RED/WHITE & BLUE Independence Day Fun!  Daughter Faith and I added red ribbon to patriotic buttons.  We found the buttons, cupcake flags, ribbon, and straws at Hobby Lobby.  Copyright 2014 Marcia Norwood

Thanks for stopping by!

Come back often, and invite a friend! 


Mary Marcia
America's STORYTELLER
Telling Untold Stories in Photographs, Prose and Public Speaking




Thursday, February 16, 2017

CHOCOLATE CAKE MIX IN A MUG RECIPE

Mary Marcia
America's STORYTELLER
Telling Untold Stories in Photographs, Prose and Public Speaking


 CHOCOLATE CAKE MIX IN A MUG
(WITH REESE'S PEANUT BUTTER CANDIES)

Homemade Cake Mix in a Mug.  Copyright 2014 Marcia Norwood
Link:  http://tellmeastory-marcia.blogspot.com/2017/02/chocolate-cake-mix-in-mug-recipe.html


Are you ready for another homemade gift project  for yourself or for your Valentine?   

Here's a recipe for a "Chocolate-Cake-Mix-In-A-Mug"  - - individual cakes that are cooked in the microwave!!!

Gather Supplies
  1. Chocolate Flavor Cake Mix
  2. Peanut Butter Cups (Miniature or Regular) Candies
  3. Small Ziploc Bags
  4. Mugs (Microwave Safe)
  5. Whisks (Optional)
  6. Tags (With Instructions) (Example Included Below)
  7. Tissue Paper (Optional)
I found CUTE mugs and bags at DEALS, and red wire whisks at Big Lots.  Copyright 2014 Marcia Norwood
 
I found CUTE mugs and bags at DEALS, and red wire whisks at Big Lots.  Copyright 2014 Marcia Norwood
  
I found CUTE mugs and bags at DEALS, and red wire whisks at Big Lots.  Copyright 2014 Marcia Norwood

Directions

1.  MEASURE 1/3 CUP Chocolate Flavor Cake Mix, and put inside small Ziploc bags.   (I got  7 - 8 bags out of one cake mix.)

Copyright 2014 Marcia Norwood
 
 2.  CHOP Reese's Peanut Butter Cup (4 miniatures or 1/2 of regular size) candies into pieces, then ADD to the cake mix in bags.

3.  SHAKE to combine.

Copyright 2014 Marcia Norwood

 4.  PLACE in a MUG (with OR without tissue paper), and ATTACH a TAG with instructions on additional ingredients, and how to bake the mix in the microwave.  Optional:  Include a small WIRE WHISK.

Copyright 2014 Marcia Norwood

Copyright 2014 Marcia Norwood

 
Copyright 2014 Marcia Norwood

 ATTACH TAG TO 
"CAKE IN A MUG" GIFT

Copyright 2014 Marcia Norwood
  
Copyright 2014 Marcia Norwood
  
Copyright 2014 Marcia Norwood


 Thanks for stopping by!

Come back often, and invite a friend!

Mary Marcia
America's STORYTELLER
Telling Untold Stories in Photographs, Prose and Public Speaking


Happy Valentine's Day!

thegraphicsfairy.com
  

I LOVE Reese's Peanut Butter Cups!   Copyright 2014 Marcia Norwood